Panel Options
Panel-level options apply to the whole weathermap. Open the panel options sidebar and look under Panel and Link Options.
Background
Where do I put my floor plan / map image?
Either embed it in the dashboard with Upload Image — nothing to host, and it travels with exports — or link it and host it yourself:
- Any
http://orhttps://URL your dashboard viewers' browsers can reach (an internal web server, a wiki attachment, an S3/object-storage link, Wikimedia Commons, ...). Preferhttpswhere you have it — but plainhttpis accepted, which matters for lab and air-gapped intranets. - Grafana's own
public/folder — copy the file onto the Grafana server, e.g./usr/share/grafana/public/img/floorplan.png, then use the relative URLpublic/img/floorplan.png. Works fully air-gapped and survives viewer networks that can't reach external hosts. - A provisioned sidecar — the demo dashboards serve their floor-plan and world-map images from the
testing/stack's exporter container on:8080; any tiny static file server works the same way.
Uploading is the simplest choice for a one-off image; linking is better for large files or art shared across several dashboards. See Linked vs embedded.
Sources are validated
The Image Source field accepts only relative Grafana paths and http/https URLs. data:, file:, javascript: and other schemes are rejected — pasting a base64 data URL into that box will not work.
To embed an image, use Upload Image instead. That is deliberate rather than an inconsistency: the upload path is where the type and size limits are enforced, so pasting cannot be used to slip an oversized or unsupported image past them.
- Color — the canvas background color.
- Image — set a background image (floor plan, geographic map, building outline, rack elevation). Choose an Image Fit (contain / cover / auto). You can either link it by URL or upload it to embed it in the dashboard — see Linked vs embedded below.
- Move With Map — when enabled, the background image is drawn inside the map canvas so it pans and zooms together with the nodes and links. When off (default), the image stays fixed like a wallpaper.
Linked vs embedded background images
There are two ways to give the panel a background, and the trade-off between them is worth understanding before you pick one.
| Linked (Image Source URL) | Embedded (Upload Image) | |
|---|---|---|
| Where the image lives | On a web server you control | Inside the dashboard JSON |
| Dashboard size | Unchanged | Grows by ~1.33× the file size |
| Sharing / export | Recipient must be able to reach the URL | Travels with the dashboard, works anywhere |
| Changing the image | Replace it on the server; every dashboard using it updates | Re-upload per dashboard |
| Breaks when… | The host moves, a port changes, or the viewer's network can't reach it | Never — there is nothing external to reach |
Link when the image is large, shared across several dashboards, or updated independently. Embed when you want the dashboard to be self-contained — exports, imports, and air-gapped installs all keep their background with no image hosting at all.
Both accept PNG, JPEG, GIF, WebP, and SVG.
Size limits for embedded images
An embedded image is stored as text inside the dashboard, which Grafana keeps in its database and re-serialises on every save. An oversized embed doesn't just bloat exports — it makes saving noticeably slower, in a way that's hard to trace back to the image. So:
| Size of the original file | What happens |
|---|---|
| Up to 1 MB | Embedded silently — the normal case |
| 1 MB – 4 MB | Embedded, with a warning suggesting SVG or a linked URL |
| Over 4 MB | Refused. Link it by URL instead, or convert it to SVG |
Base64 encoding adds about 33%, so a 1 MB file becomes roughly 1.33 MB of dashboard JSON.
Prefer SVG
Vector art is dramatically smaller for exactly the kind of image this panel wants. The rack elevation used in the demo dashboards is a detailed multi-device drawing and it embeds in 53 KB — a screenshot of the same rack would cost megabytes and look worse when zoomed. If your source is a photo or screenshot, consider linking it rather than embedding.
Whichever you choose, if the image can't be loaded the panel tells you: while editing, a broken or rejected background shows a notice naming the problem, rather than silently drawing your nodes on an empty canvas. The notice is edit-mode only, so a dashboard on a wall display is never interrupted by it.
Canvas size, zoom, and offset
| Option | Purpose |
|---|---|
| Viewbox Width / Height (px) | The logical size of the drawing area. |
| Zoom Scale | Current zoom level (also controlled by scroll — see Interactions). |
| View Offset X / Y | Current pan offset. |
| Display Timestamp | Show the time-range end timestamp in the corner. |
Grid (snapping and guide lines)
The grid makes node dragging snap to fixed steps, so a large map can be aligned cleanly instead of by eye. It is off by default — a new panel has no grid and no guide lines.
Where the options are
Edit the panel → in the options sidebar, scroll to Grid Options:
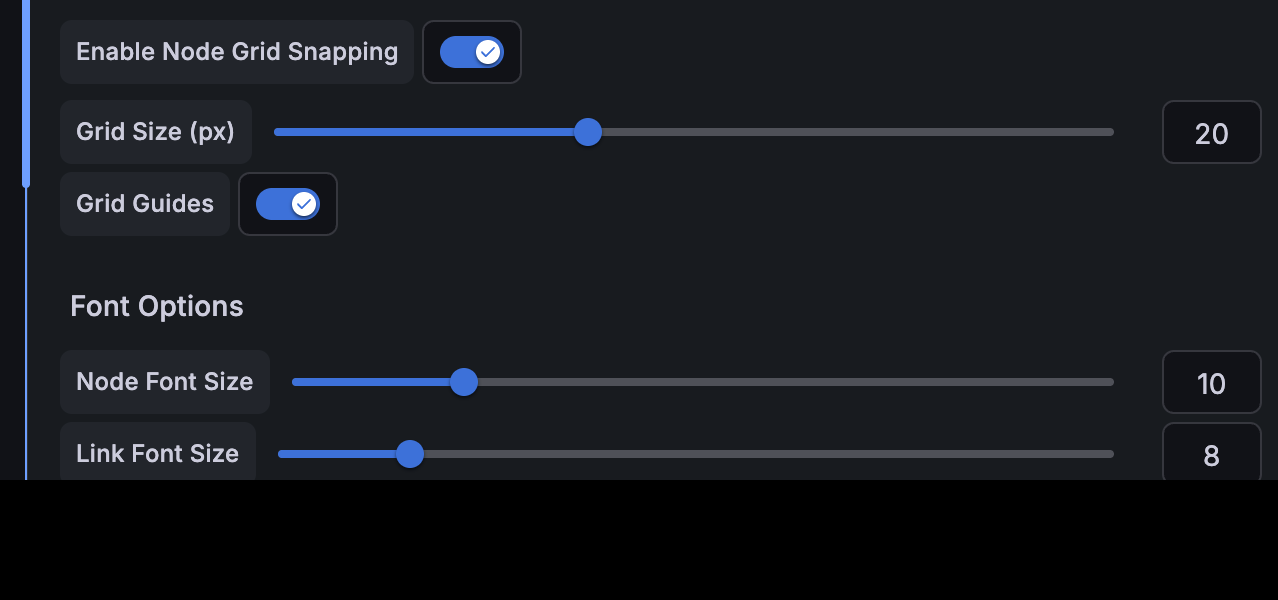
| Option | What it does |
|---|---|
| Enable Node Grid Snapping | The master switch. Node drags snap to the grid. Turning this off also clears Grid Guides for you. |
| Grid Size (px) | The step that drags snap to. Only shown while snapping is on. |
| Grid Guides | Draws the grid lines so you can see what you are snapping to. |
Turning the grid lines on
- Edit the panel (hover it and press
e). - Open Grid Options and turn on Enable Node Grid Snapping.
- Set a Grid Size — 10–25 px suits most maps.
- Turn on Grid Guides to see the lines.
- Back to dashboard → Save dashboard.
Turning the grid lines off
| Goal | Do this |
|---|---|
| Remove the lines, keep snapping | Turn off Grid Guides |
| Remove both, in one toggle | Turn off Enable Node Grid Snapping — it clears the guides for you |
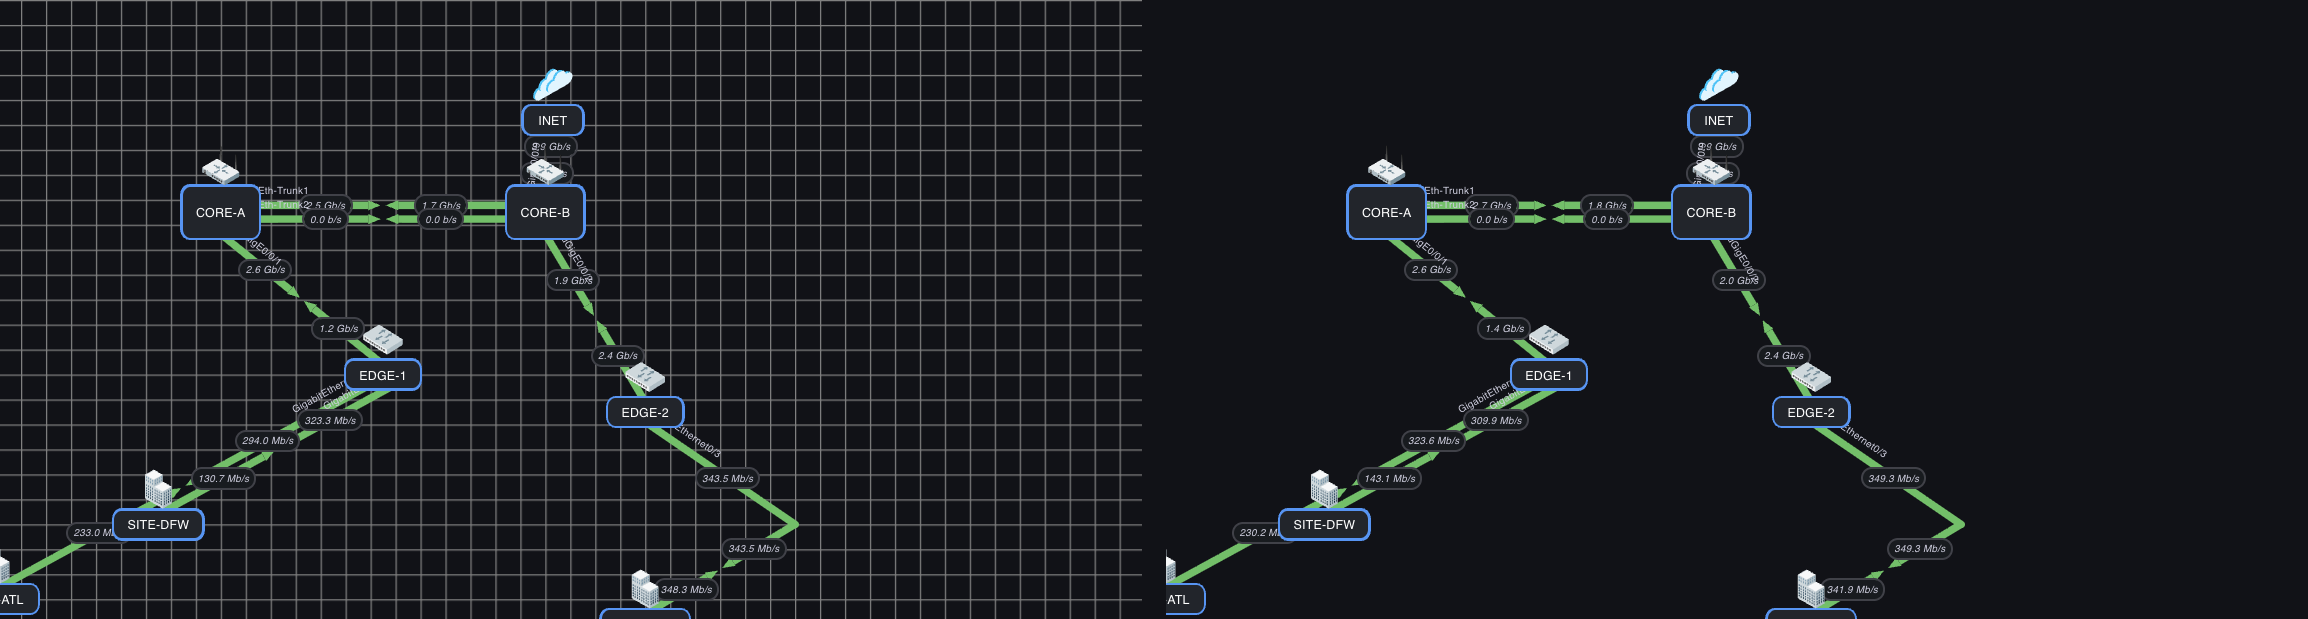
The same map while editing: Grid Guides on (left) and off (right). Snapping is on in both — the lines only change whether you can see the grid you are snapping to.
Guide lines are an editing aid only
Grid Guides are drawn only while the panel editor is open. A saved dashboard never shows them, because a viewer cannot drag anything and the lines would just be graph paper over the map. Snapping is unaffected, and the setting itself is preserved — reopen the editor and the guides come back.
Value Display Mode
Controls how each metric is resolved from the data points across the selected dashboard time range:
| Mode | Meaning |
|---|---|
| Last | The most recent data point (default). |
| Average | Mean of all points in the range. |
| Min | Smallest value in the range. |
| Max | Largest value in the range. |
| 95th Percentile | 95th percentile over the range. |
Use Average / 95th Percentile for capacity-planning views where a single-point snapshot is misleading; Max to catch peaks.
Timeline Slider
Enable Timeline Slider to add a scrubber at the bottom of the panel. Drag it to move through the selected time range and see link values as they were at that moment — the map's link values update retroactively.
- A timestamp label shows the selected time.
- The Live button returns to the latest/aggregate value.
- Off by default; enabling it changes nothing until you scrub.
Perfect for incident retrospectives (replay an outage), trend analysis, and comparing peak vs. baseline periods.
Scope
The slider currently scrubs link values. Node status coloring follows the latest value.
Animation (traffic flow)
The Animation section turns on metric-driven moving dots along links, showing traffic direction and intensity. It is off by default and changes nothing until enabled.
| Option | Default | What it does |
|---|---|---|
| Enable Traffic Animation | Off | Master switch for all link animation. |
| Respect Reduced Motion | On | AND-gated with the viewer's OS prefers-reduced-motion preference. |
| Pause In Edit Mode | On | Freezes animation while editing the panel. |
| Show Animation Legend | On | Built-in legend; only shown while animation is active. |
| Max Animated Links | 100 | Hard cap on simultaneously animated links (large-map safety). |
Individual links can also opt in or out via the link editor. See the full guide — data sources, PromQL, speed/density mapping, down-link behavior — in Traffic Animation.
Default link units and decimals
- Default Link Units — the unit formatter used by links that don't set their own.
- Link Value Decimal Places — fixes decimal precision on link labels (blank = automatic).
Coloring behavior
| Option | Purpose |
|---|---|
| Color Scale Mode | Match thresholds by percent (current ÷ bandwidth) or by absolute value. |
| Gradient Color | Blend the link color between its A and Z endpoint colors. |
| Dynamic Stroke | Scale link stroke width with utilization (min/max width). |
| Flow Animation | Animate the link's dashes in the direction of flow (with a speed setting). |
Color scale / thresholds
Define the Color Scale — a list of threshold → color stops. Depending on Color Scale Mode, thresholds are matched against utilization percent or the raw value. The legend at the bottom of the panel reflects these bands. Thresholds above 100% are supported for oversubscribed links.
Tooltip settings
Customize the hover tooltip: font size, text/background colors, inbound/outbound line colors, and whether the mini graph scales to bandwidth.